The Scottish Health Survey 2008
The Scottish Health Survey 2008
APPENDIX B: MEASUREMENT PROTOCOLS
1 HEIGHT MEASUREMENT
1.1 Introduction
The height measurement is a measure of anthropometry, which provides information on the size and proportions of the human body. When taken in conjunction with other anthropometric measures it is an indicator of, and can predict, the nutritional status, performance, health and survival of a population and can thus be used to determine public health policies. Moreover, height is often used as an indicator of people's quality of life. This is based on evidence that final height is a combination of genetic and environmental factors, where a taller population is indicative of a better quality of life due to access to health services and nutrition.
1.2 Exclusion criteria
Respondents are excluded from the height measurement if:
- They are pregnant
- They are too stooped to obtain a reliable measurement
- After a discussion with the respondent it becomes clear that that they are too unsteady on their feet
- They are chairbound
- If the respondent finds it painful to stand or sit up straight
1.3 Equipment
You will need:
- A portable stadiometer (see figure 2 below)
- A Frankfort Plane card.
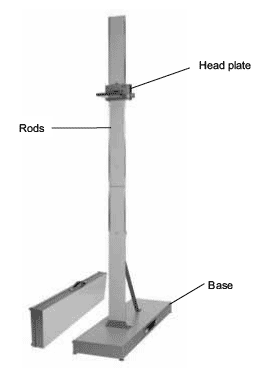
Figure 1 The stadiometer
1.4 Procedure for adults
1. Ask the respondent to remove their shoes.
2. Assemble the stadiometer, near a wall if possible, and raise the headplate to allow sufficient room for the respondent to stand underneath it. Double check that you have assembled the stadiometer correctly.
3. Ask the respondent to stand with their feet flat on the centre of the base plate, feet together and heels against the rod as this helps people to 'be at their highest'. The respondent's back should be as straight as possible, preferably against the rod but NOT leaning on it. They should have their arms hanging loosely by their sides. They should be facing forwards.
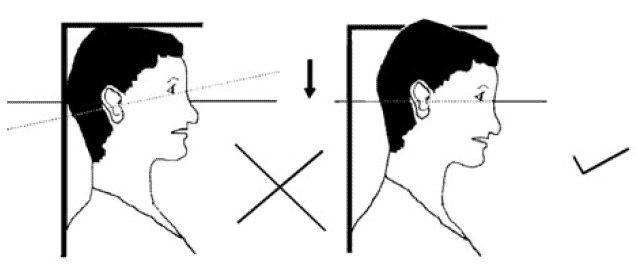
4. Move the respondent's head so that the Frankfort Plane is in a horizontal position (i.e. parallel to the floor). The Frankfort Plane is an imaginary line passing through the external ear canal and across the top of the lower bone of the eye socket, immediately under the eye (see Figure 3). This position is important if an accurate reading is to be obtained. An additional check is to ensure that the measuring arm rests on the crown of the head, i.e. the top back half. To make sure that the Frankfort Plane is horizontal, you can use the Frankfort Plane Card to line up the bottom of the eye socket with the flap of skin on the ear. The Frankfort Plane is horizontal when the card is parallel to the stadiometer arm.
Figure 2 The Frankfort Plane
5. Instruct the respondent to keep their eyes focused on a point straight ahead, to breathe in deeply and to stretch to their fullest height. If after stretching up the respondent's head is no longer horizontal, repeat the procedure. It can be difficult to determine whether the stadiometer headplate is resting on the respondent's head. If so, ask the respondent to tell you when s/he feels it touching their head.
6. Ask the respondent to step forwards. If the measurement has been done correctly the respondent will be able to step off the stadiometer without ducking their head. Make sure that the head plate does not move when the respondent does this.
7. Look at the bottom edge of the head plate cuff. There is an arrowhead pointing to the measuring scale. Take the reading from this point and record the respondent's height in centimetres and millimetres. If a measurement falls between two millimetres, it should be recorded to the nearest even millimetre (see section 2.4).
8. If the respondent wishes, record their height onto the measurement record card.
9. Push the head plate high enough to avoid any member of the household hitting their head against it when getting ready to be measured. Once you have finished measuring everyone, lower the head plate to its lowest position, ready for dismantling.
1.5 Procedure for children
The procedure for measuring children aged 2-15 differs slightly from that for adults. You must get the co-operation of an adult household member. You will need their assistance in order to carry out the protocol, as children are more likely to be co-operative themselves if another household member is involved in the measurement. If possible measure children last so that they can see what is going on before they are measured themselves.
Children's bodies are much more elastic than those of adults. Unlike adults they will need your help in order to stretch to their fullest height. This is done by stretching them. This is essential in order to get an accurate measurement. It causes no pain and simply helps support the child while they stretch to their tallest height.
1. Explain to the parent and child what you will be doing, and ensure that both are happy with the procedure.
2. In addition to removing their shoes, children should remove their socks as well to ensure that they do not slip on the base of the stadiometer, and so that you can easily check their feet are flat on the base plate, not on tiptoes.
3. Assemble the stadiometer and raise the head plate to allow sufficient room for the child to stand underneath it.
4. Ask the child to stand with their feet flat on the centre of the base plate, feet together and heels against the rod. The child's back should be as straight as possible, preferably against the rod, and their arms hanging loosely by their sides. They should be facing forwards.
5. Place the measuring arm just above the child's head.
6. Move the child's head so that the Frankfort Plane is in a horizontal position (see Figure 3). This position is as important when measuring children as it is when measuring adults if the measurements are to be accurate. To make sure that the Frankfort Plane is horizontal, you can use the Frankfort Plane Card to line up the bottom of the eye socket with the flap of skin on the ear. The Frankfort Plane is horizontal when the card is parallel to the stadiometer arm. Explain what you are doing and tell the child that you want them to stand up straight and tall, but not to move their head or stand on their tiptoes. Ask them to look straight ahead.
7. Cup the child's head in your hands, placing the heels of your palms either side of the chin, with your thumbs just in front of the ears, and your fingers going round towards the back of the neck. (See Figure 4).
Figure 3 The child stretch
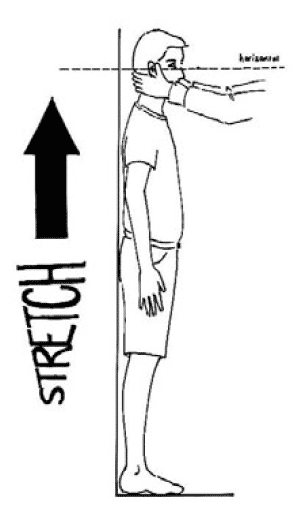
8. Ask the child to breathe in. Firmly but gently, apply upward pressure lifting the child's head upward towards the stadiometer headplate and thus stretching the child to their maximum height. Avoid jerky movements, perform the procedure smoothly and take care not to tilt the head at an angle, you must keep it in the Frankfort plane.
9. Ask the household member who is helping you to lower the headplate down gently onto the child's head. Make sure that the plate touches the skull and that it is not pressing down too hard.
10. Still holding the child's head, relieve traction and allow the child to stand relaxed and breathe out. If the measurement has been done properly the child should be able to step off the stadiometer without ducking their head. Make sure that the child does not knock the head plate as they step off.
11. Read the height value in metric units to the nearest even millimetre (see section 2.4) and enter the reading into CAPI.
12. If the respondent wishes, record the reading on the child's measurement record card.
13. Push the head plate high enough to avoid any member of the household hitting their head against it when getting ready to be measured.
1.6 Additional points
- If the respondent cannot stand upright with their back against the stadiometer and have their heels against the rod (e.g. those with protruding bottoms) then give priority to standing upright.
- If the respondent has a hair style which stands well above the top of their head, or is wearing a religious head dress, with their permission, bring the headplate down until it touches the hair/head dress. You should never ask someone to remove a religious head dress. With some hairstyles you can compress the hair to touch the head. If you cannot lower the headplate to touch the head and think that this will lead to an unreliable measure, record this on CAPI. If it is a possible that can be altered e.g. a bun, if possible ask the respondent to change/undo it.
- If the respondent is tall, it can be difficult to line up the Frankfort Plane in the way described. When you think that the plane is horizontal, take one step back to check from a short distance that this is the case.
- You may need to tip the stadiometer to read the height of tall respondents.
- If the respondent has long hair then they may need to tuck it behind their ear in order for the head to be positioned properly. Always ask the respondent to tuck their hair behind their ears.
2 WEIGHT MEASUREMENT
2.1 Introduction
Similar to the height measurement, the weight measurement is an indicator of and can predict the nutritional status and health of a population. When used in conjunction with the height measurement it can be used to derive the Body Mass Index, a statistical measure used to determine if an individual's weight falls within a healthy range.
2.2 Exclusion criteria
Respondents are excluded from this measurement if they are:
- Pregnant
If the woman wishes to be weighed, you can but do not enter the results into the computer.
- Too frail or unable to stand upright
If you are concerned that being on the scales may cause them to be too unsteady on their feet then do not weigh them. Alternatively you can place the scales next to something that they can steady themselves on.
- Over 130kg (20 ½ stone) in weight
The maximum weight registering accurately on the scales is 130kg. If you think that they exceed this limit then code it appropriately in CAPI and follow the prompts. Do not attempt to weigh them.
2.3 Equipment
There are two different sets of scales in circulation on NatCen projects. You will be provided with either:
- Tanita THD-305 scales
The weight is displayed in a window on the scales. The scales are switched on by pressing the button on the bottom right hand corner of the scales. They are battery operated and require four 1.5v AA batteries, which should be sent with the scales. They may be packed separately or one of the batteries may be turned around, to prevent the batteries from going flat, as there is no on/off switch. Ensure that you have spare batteries, just in case you need them.
- Seca 870 scales
The weight is displayed in a window on the scales. The scales are switched on by briefly covering the solar cell (for no more than one second). The solar cell is on the right hand side of the weight display panel. NB You may experience difficulties switching the scales on if there is insufficient light for the solar cell. Make sure that the room is well lit. The scales have a fixed battery which cannot be removed.
Please check which scales you have been provided with and make sure that you are familiar with how they operate.
2.3.1 Calibrating the scales
The scales will need to be sent to Brentwood at regular intervals to be recalibrated to ensure that they provide accurate measurements. On each set of scales there is a label with a date that they need to be recalibrated by, ensure that they have been sent to Brentwood by this date.
2.3.2 Technical faults
Please refer to Table 1 when experiencing technical difficulties with the scales.
Table 1 Troubleshooting for the scales
Fault |
Action |
|---|---|
Tanita THD 305 scales |
|
No row of 8s when turned on or will not turn on |
|
Inconsistent readings |
|
Seca 870 scales |
|
No '1888' when turned on or will not turn on |
|
Inconsistent readings |
|
2.4 Procedure for adults
1. Weigh the respondent on a hard and even surface if possible. Carpets may affect measurements.
2. Ask the respondent to remove shoes, heavy outer garments such as jackets and cardigans, heavy jewellery, and to empty their pockets of all items.
3. Switch on the scales and wait for 888.8 (for the Tanita scales) or 1888 (for the Seca scales) to be momentarily displayed in the window. Do not attempt to weigh anyone at this point.
4. When the display reads 0.0, ask the respondent to stand with their feet together in the centre and their heels against the back edge of the scales. Their arms should be hanging loosely at their sides and their head should be facing forward. Having the respondent stand in this position means that the most accurate weight measurement can be obtained. Ensure that they keep looking ahead - it may be tempting for the respondent to look down at their weight reading. Ask them not to do this and assure them that you will tell them their weight afterwards if they want to know.
5. The scales will need to stabilise. The weight reading will flash on and off when it has stabilised. If the respondent moves excessively while the scales are stabilising you may get a false reading. If you think this is the case reweigh the respondent.
6. The scales are calibrated in kilograms and 100 gram units (0.1 kg). Record the reading in CAPI before the respondent steps off the scales.
7. If the respondent wishes, record the reading on their measurement record card.
8. The scales should switch off automatically a few seconds after the respondent steps off them.
2.5 Procedure for children
1. You must get the co-operation of an adult household member. This will help the child to relax and children, especially small children are much more likely to be co-operative themselves if an adult known to them is involved in the procedure.
2. Children who wear nappies should be dry. If the nappy is wet, please ask the parent to change it for a dry one and explain that the wetness of the nappy will affect the weight measurement.
3. Weigh the child, following the same procedure for adults. Encourage the child to 'Be as still as a statue' for an accurate reading. If you think that the results are inaccurate, code this in CAPI.
For very young children who are unable to stand unaided or small children who find this difficult follow the procedure below you will need to ask for the assistance of an adult as the following procedure requires you to measure the adult and then the adult holding the child:
1. Explain to the adult what you are going to do and the reasons why.
2. Code in CAPI the procedure used to measure the weight of the child.
3. Weigh the adult as normal following the protocol as set out above. Enter this weight into CAPI.
4. Weigh the adult and child together and enter this into CAPI.CAPI will calculate the difference between the two weights to get the child's weight.
5. If the respondent wishes record this reading on their measurement record card.
3 DEMISPAN MEASUREMENT
3.1 Introduction
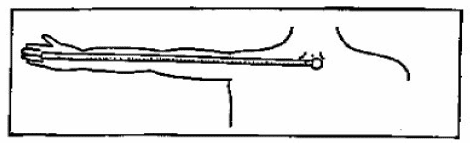
Only those aged 65 or over are eligible to have their demi-span measurement taken. The demispan measurement is an alternative measure of height. It is the distance between the midline of the sternal notch and the base of the fingers between the middle and ring fingers, with the arm out-stretched laterally (see Figure 4).
Figure 4 The Demispan Measurement
The demispan measurement is taken when it is difficult to measure height accurately. For example if the respondent cannot stand straight or is unsteady on their feet as is quite often in the case of the elderly and some disabled people. It is used as a proxy for a height measurement as there is a relationship between demispan and 'true height'. Additionally, height decreases with age to a varying degree depending on individuals, and thus the standard measure of height may be less useful for some older respondents. The long bones in the arm do no get shorter however, and thus can be used to estimate accurately a respondent's 'true height'.
3.2 Exclusion criteria
Respondents are excluded from the demispan measurement if:
- They cannot straighten either arm without pain or discomfort.
3.3 Equipment
You will need:
- A thin retractable demispan tape calibrated in cm and mm
- A skin marker pencil
- Micropore tape
3.3.1 Using the demispan tape
A hook is attached to the tape and this is anchored between the middle and ring fingers at the finger roots. The tape is then extended horizontally to the sternal notch.
The tape is fairly fragile. It can be easily damaged and will dent or snap if bent or pressed too firmly against the respondent's skin. Also the ring connecting the hook to the tape is a relatively weak point. Avoid putting more strain on this ring than necessary to make the measurements. When extending the tape, hold the tape case rather than the tape itself as this puts less strain on the hook and tape. When placing the tape against the sternal notch, do not press into the sternal notch so much that the tape kinks.
3.4 Preparing the respondent
Explain to the respondent the purpose of conducting the demispan measurement and explain the procedure. Further explain that the measurement requires minimal undressing because certain items may affect the accuracy of the measurement. The items of clothing that will need to be removed include:
- Ties
- Jackets, jumpers and other thick garments
- Jewellery items such as chunky necklaces/bracelets
- Shoulder pads
- High heeled shoes
- Shirts should be unbuttoned at the neck
If the respondent does not wish to remove any item that you think might affect the measurement, record that the measurement was not reliable in CAPI.
For the purpose of consistency, where possible the right arm should always be used. If this is not possible, carry out the measure on the left arm and make a note of this in CAPI.
3.5 Procedure
1. Locate a wall where there is room for the respondent to stretch his/her arm. They need to stand with their back to the wall but not support themselves on it, standing approximately 3 inches (7cm) from the wall.
2. Ask the respondent to stand with weight evenly distributed on both feet, head facing forward.
3. Have them raise their right arm and extend it horizontally to their side until it is parallel with the floor. The right wrist should be in neutral rotation and neutral flexion. Rest your left arm against the wall allowing the respondent's right wrist to rest on your left wrist.
4. When the respondent is in the correct position, mark the skin at the centre of the sternal notch using the skin marker pencil. This mark must be made when the respondent is standing in the correct position. Explain to the respondent that the mark will wash off afterwards.
5. If clothing, jewellery or subcutaneous fat obscures the sternal notch, use a piece of micropore tape on the clothing or jewellery. If the respondent refuses to the use of the marker pen or the tape, proceed with the measurement but record it as unreliable in CAPI.
6. Ask the respondent to relax while you get the demispan tape.
7. Place the hook between the middle and ring fingers of the respondent so that the tape runs smoothly across the arm.
8. Ask the respondent to get into the position they were in previously, with their arm raised horizontally, the wrist in neutral flexion and rotation. Check they are in the correct position.
9. Extend the tape to the sternal notch. If no mark was made, feel for the correct position and extend the tape to this point.
10. Ask the respondent to stretch his/her arm checking that they remain in the same position, the hook has not moved on their fingers and that the respondent is not leaning on the wall or bending at the waist.
11. Record the measurement in CAPI, in centimetres and millimetres. Always report to one decimal place. If the length lies halfway between 2 millimetres, then round to the nearest even millimetre (see section 2.4).
12. Ask the respondent to relax and loosen up the right arm by shaking it gently.
13. Repeat steps 2-11. Explain to the respondent that the measure needs to be taken again for accuracy. If the second measure is significantly different to the first, CAPI will give you an error message. At this point you can check to make sure that you have entered the readings correctly or take a third measure if there is another reason for the measurements being different. This is to be taken in the same way as the previous two. CAPI will work out which two of the three readings to use.
14. If the respondent wishes, record the results on their measurement record card. You can use the conversion chart on your showcards to convert the results into inches.
3.6 Additional points
- If the respondent is unable to stand in the correct position or finds it difficult to stand steadily, ask them to sit for the measurement. Use an upright chair and position it close to a wall. If a respondent is unable to sit or stand, the measurement can be taken when the respondent is lying down. In both cases still try to support the arm if possible. You may need to sit or kneel to take the reading.
- Record in CAPI how the measurement was taken (i.e.. with respondent standing, sitting, etc).
- If there is no wall available for the respondent to stand in front of and extend their arm horizontally, have them stand in front of any other flat surface e.g. in front of a cupboard or window, ensuring that they are not supporting their body weight on this surface.
- If the respondent is much taller than you take the measurement with the respondent sitting.
- If the respondent's arm is much longer than yours is, support the arm close to the elbow rather than wrist level. Your arm must not be between the elbow and shoulder, as this will not provide sufficient support.
4 WAIST AND HIP CIRCUMFERENCES
4.1 Introduction
There has been increasing interest in the distribution of body fat as an important indicator of increased risk of cardiovascular disease. The waist and hip circumferences are measures of the distribution of body fat (both subcutaneous and intra-abdominal). Analyses suggest that waist circumference and waist-hip ratio are predictors of health risk like the body mass index (weight relative to height).
4.2 Exclusion criteria
Respondents are excluded from the waist and hip circumference measurement if they:
- Are pregnant
- Are chairbound
- Have a colostomy/ileostomy
4.3 Equipment
You will need:
- An insertion tape calibrated in millimetres
4.3.1 Using the insertion tape
The tape is passed around the circumference and the end of the tape is inserted through the metal buckle at the other end of the tape. To check the tape is horizontal you have to position the tape on the right flank and look round the participant's back from his/her left flank to check that it is level. This will be easier if you are kneeling or sitting on a chair to the side of the respondent. When taking the reading, be sure not to lift the tape, hold it flat against the body otherwise you will get an inaccurate measurement.
4.4 Preparing the respondent
The respondent needs to be wearing light clothing. Explain to the respondent the importance of this measurement and that clothing can substantially affect the reading. If possible the respondent needs to remove:
- All outer layers of clothing, such as jackets, heavy or baggy jumpers, cardigans and waistcoats
- Shoes with heels
- Tight garments intended to alter the shape of the body, such as corsets, lycra body suits and support tights/underwear
- Belts
Pockets should be emptied and if possible ask the respondent to empty their bladder before taking the measurement. If a urine sample is to be collected, this would be a good time to ask the respondent to provide it.
Some respondents may be wearing religious or other symbols which they cannot remove and which may affect the measurement. Do not embarrass or offend the respondent by asking them to remove such items. Record in CAPI if the measurement is likely to be affected by this.
4.5 Procedure
Steps 1-3 apply to both waist measurement (section 8.5.1) and hip measurement (section 8.5.2).
1. Ensure that the respondent is standing erect in a relaxed manner and breathing normally. Weight should be evenly balanced on both feet and the feet should be about 25-30cm (1 foot) apart. The arms should be hanging loosely at their sides. This position will provide the most accurate measurement of both the waist and the hip, and will allow for them to be measured easily.
2. If possible, kneel or sit on a chair to the side of the respondent.
3. With assistance from the respondent pass the tape around the respondent's body, or if they are able to, get them to pass the tape around themselves and check that it is not twisted. Insert the plain end of the tape through the metal ring at the other end of the tape.
4.5.1 Measuring waist circumference
4. The respondent's waist is located midway between the iliac crest and the costal margin (lower rib). To locate the levels of the costal margin and the iliac crest, ask the respondent if you can touch them, and use the fingers of your right hand held straight and pointing in front of the participant to slide upward over the iliac crest.
5. Position the tape at the respondent's waist, ensuring that it is horizontal.
6. Ask the respondent to breathe out gently and to look straight ahead. This is to prevent the respondent from contracting their muscles or holding their breath.
7. Take the measurement at the end of a normal expiration by holding the buckle flat against the body and flattening the end of the tape to read the measurement from the outer edge of the buckle.
8. Record the measurement in CAPI in centimetres and millimetres. Always record to a one decimal place. If the result falls between two millimetres, record to the nearest even millimetre (see section 2.4).
9. Repeat steps 1-8 to record a second measurement. If the second reading differs significantly from the first, CAPI will report an error message. At this point check that you have entered the results into CAPI correctly. Otherwise take a third measurement, following the procedure above. Enter this result into CAPI, the computer will know which two results to use.
4.5.2 Measuring hip circumference
9. The respondent's hip circumference is the widest circumference over the buttocks and below the iliac crest.
10. Position the tape in this area ensuring that the respondent is looking straight ahead and not contracting their gluteal muscles. Ensure the tape is horizontal.
11. Measure the circumference at several positions over the respondent's buttocks, by holding the buckle flat against the body and flattening the end of the tape to read the measurement from the outer edge of the buckle.
12. Record the widest circumference in CAPI. Always record to one decimal place. Report in centimetres and millimetres. If the result falls between two millimetres, record to the nearest even millimetre (see section 2.4).
13. Repeat steps 1-3 and 9-12 to record a second measurement. If the second reading differs substantially from the first, CAPI will report an error message. At this point check that you have entered the results into CAPI correctly. Otherwise take a third measurement, following the procedure above. Enter this result into CAPI, the computer will know which two results to use.
14. If the respondent wishes, record the waist and hip measurement on their measurement record card.
4.6 Additional points
- If you have problems palpating the rib, ask the respondent to breathe in very deeply. Locate the rib and as the respondent breathes out, follow the rib as it moves down with your finger.
- The tape should be tight enough so that it doesn't slip but not tight enough to indent clothing.
- If the respondent is large, ask him/her to pass the tape around rather than 'hug' them. Remember to check that the tape is correctly placed to take the measurement and horizontal all the way around.
- Some respondents will be wearing clothing where the waistband of the trousers/skirt sits on the waist. Do not attempt to move the clothing or take the measurement at a different position. Measure the waist circumference over the waistband and make a note of this in CAPI. If the waistband is not horizontal all the way around the body i.e. it may be lower at the front, always ensure that the tape is horizontal which may mean that it passes over the waist band in some places and not in others. If there are belt loops, thread the tape through the loops so that they don't add to the measurement.
- We only want to record problems that will affect the measurement by more than would be expected when measuring over light clothing. As a rough guide only record a problem if you feel it affected the measurements by more than 0.5cm. We particularly want to know if waist and hip are affected differently.
5 RECORDING AMBIENT AIR TEMPERATURE
5.1 Introduction
Many of the physical measures taken fluctuate considerably due to air temperature. To be able to standardise the results that are obtained air temperature must be recorded. CAPI will tell you when to record the air temperature.
5.2 Equipment
You will need:
- A digital thermometer
- A probe
5.2.1 Using the thermometer
1. This instrument is very sensitive to minor changes in air temperature and thus it is important that ambient air temperature be recorded at the appropriate times, as prompted by CAPI.
2. It can take a few minutes to settle down to a final reading if it is experiencing a large change in temperature.
3. When "LO BAT" is shown on the display the battery needs replacing, take no further readings.
4. To preserve battery power, the thermometer may switch itself off after 7 minutes.
5. The battery in the thermometer is a long-life battery and should last at least one year. However, should it run low please purchase a new battery. Take the old one with you to ensure it is the same type. Claim in the usual way.
6. To remove an old battery and insert a new one, unscrew the screw on the back of the thermometer, insert the new battery and replace the cover.
5.3 Procedure
1. Set up the thermometer, usually on a surface near the Omron (blood pressure equipment), by plugging the probe into the socket at the top of the instrument. Do not let the probe touch anything and ensure that it is not near a radiator or in the sun. It is recommended that the probe hang over the edge of a table.
2. When prompted by CAPI to take a reading, turn on the thermometer by pressing the completely white circle.
3. Wait for the reading to stabilise and take a reading.
4. Record the air temperature in CAPI to one decimal place e.g. 21.4. Do not round this to a whole number.
5. To preserve battery life please ensure that after taking the reading the thermometer is switched off by pressing the white ring.
6 LUNG FUNCTION
6.1 Introduction
Lung function tests objectively assess respiratory function and are widely used in clinical practice to diagnose and monitor the progress of respiratory diseases such as asthma and chronic obstructive airways disease. A lung function test produces values across the various measures tabled below (Table 2). A wide range of variables can affect these factors, for example physical unfitness, smoking, chronic bronchitis, poorly controlled asthma, some muscular disorders and many other conditions. At a population level, these measures tell us a lot about the respiratory health of the population and are also indicators of general health.
Table 2 Lung function test values
Test |
Abbrev |
Definition |
|---|---|---|
Forced Vital Capacity |
FVC |
The total amount of air that can forcibly be blown out after a full inspiration, measured in litres. |
Forced Expiratory Volume in 1 Second |
FEV1 |
The amount of air that can be blown out in one second, measured in litres. |
FEV1% |
FEV1/ FVC |
The ratio of FEV1 to FVC. |
Peak Expiratory Flow |
PEF |
The speed of air moving out of your lungs at the beginning of expiration, measured in litres per second. |
Forced Expiratory Flow |
FEF |
The average flow (or speed) of air coming out of the lung during the middle portion of expiration. |
Forced Inspiratory Flow |
FIF |
Similar to FEF except the measurement is taken during inspiration. |
Forced Expiratory Time |
FET |
The length of expiration in seconds. |
Tidal Volume |
TV |
The specific volume of air that is drawn into |
6.2 Exclusion criteria
Respondents are excluded from the lung function measurement if they:
- Are pregnant
- Have had abdominal or chest surgery in the preceding three weeks
- Have been admitted to hospital with a HEART complaint in the preceding six weeks
- Have had eye surgery in the preceding 4 weeks
- Have a tracheostomy
6.3 Equipment
You will need:
- A Vitalograph Escort spirometer and case
- A 1 litre calibration syringe
- Disposable cardboard mouthpieces
6.3.1 Caring for the spirometer
1. For the purposes of hygiene and accuracy, once a month or after every 50 respondents remove the flowhead and clean it in hot soapy water and allow it to dry overnight before refitting.
2. When necessary clean the exterior with a lint free damp cloth. DO NOT clean the two white cylindrical filters on the top of the unit.
6.3.2 Using the spirometer
1. Take a spare battery with you in case of battery failure. The spirometer uses a 9v pp3 battery.
2. Whenever the 'ON' button is pressed to perform a new test, ensure that the spirometer is placed on a flat surface with the mouthpiece pointing upwards.
3. Unpack the spirometer as soon as possible and keep it away from direct heat. Allow the spirometer to equilibrate to room temperature before the lung function tests are performed.
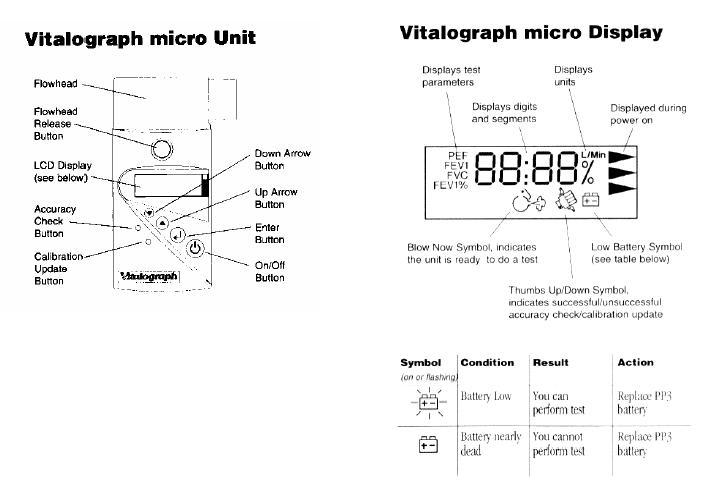
4. See Figure 6 for the spirometer unit and the display
Figure 5 The Spirometer
6.3.3 Calibration/accuracy test
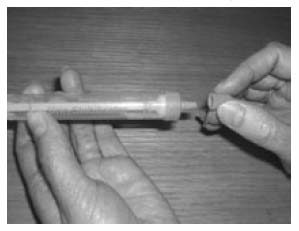
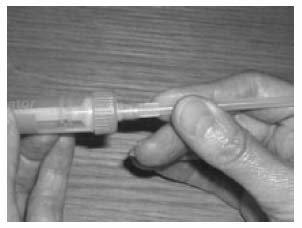
1. Before using the spirometer its accuracy must be checked by calibrating it. This procedure can be done in your own home at the start of each day when you are working. If you have more than one visit in the same day you need to calibrate the spirometer only once. You should not need to take the calibration syringe with you when you make a visit.
2. Ensure that the spirometer and syringe have been in the same temperature environment for at least an hour.
3. Connect the spirometer, by the flow head, to the syringe. Pump through a few litres of air, then disconnect the spirometer.
4. Switch on the spirometer and press the small top most button to the left of the arrow keys (the accuracy check button). The display will show a number.
5. Check display is 01. If not, adjust with up/down arrow keys (see figure 6).
6. Press the left arrow key (the enter button) and wait until display shows 'blow now' and 'thumbs down' symbols.
7. Making sure the syringe piston is fully withdrawn, connect the syringe to the flow head. The handle of the spirometer should be pointing upwards.
8. Using one swift, smooth stroke pump in the volume of air (about 1 second). Don't cover the outlet with your hand.
9. Wait for a double beep then withdraw the piston fully and repeat step 8 until five single beeps occur. It is very important to wait for the double beep before withdrawing the piston each time.
10. If 'thumbs up' is displayed, the spirometer has been correctly calibrated.
11. If a 'thumbs down' sign appears on the display, then the spirometer is outside the accuracy requirements, contact Brentwood to arrange for a replacement.
12. Press the On/Off button to switch off.
6.3.4 Technical faults
Refer to table 3 if technical difficulties are experienced with the spirometer
Table 3 Troubleshooting for the spirometer
Fault |
Action |
|---|---|
Nothing is displayed when the ON button is pressed |
|
False readings suspected |
|
Calibration values vary greatly |
|
If any problems persist, contact Brentwood for advice.
6.4 Preparing the respondent
Before commencing the spirometer procedure explain the following to all eligible respondents:
- The purpose of the test and how to use the spirometer.
- To ensure an accurate reading they must 'blow' as hard as they can so long as it does not cause them any pain and/or discomfort.
- The definition of an acceptable level of lung function depends on the person's age, sex and height.
- A diagnosis of abnormality is not based on a reading from a single occasion but is rather based on several measurements and on the person's clinical history.
6.4.1 Demonstrating
For an accurate reading of lung function it is very important that you demonstrate the blowing technique to each respondent. Do this using a spare mouthpiece that is not connected to the spirometer and follow the procedure below:
1. Explain that the mouthpiece should be held in place by the lips, not the teeth and that the lips are wrapped firmly around the mouthpiece so no air can escape.
2. Demonstrate a blow, pointing out afterwards the need for full inspiration, a vigorous start to exhalation and sustained expiration. The blow should be at least 3 seconds in duration and not interrupted by coughing, laughing or leakage of air. The torso should remain in an upright position throughout the blow, not hunched over at the end.
6.5 Procedure
1. The respondent must be standing, unless chairbound, and they should loosen tight clothing to allow for a bigger inspiration. If the respondent wears dentures, it is preferable that they leave them in as they will get a tighter seal with their mouth around the mouthpiece which will result in a more accurate result.
2. Following the demonstration, hand the respondent a clean disposable mouthpiece and allow the respondent at least one practice blow using the mouthpiece alone. Correct their technique where necessary.
3. Attach the respondent's mouthpiece and turn the unit on using the 'ON/OFF' button. Check that the 'low battery' symbol is not showing.
4. Gently hand the spirometer to the respondent as sudden jerky movements can destabilise the unit. If a single beep sounds at this point, wait for the spirometer to stabilise, indicated by a further double beep, before proceeding with the test. The display should also display the 'blow' symbol.
5. Ask the respondent to take as deep a breath as possible, keeping the spirometer away from their mouth, and then to hold the mouthpiece with their lips and seal their lips around it so that air does not escape while they are blowing. Check that the spirometer is held below the flowhead with the handle pointing downwards and the subject's hand is not obstructing the flowhead outlet.
6. Then say "now blow!" As the respondent is blowing encourage him/her by saying "keep going, keep going, keep going..." to get the maximum expiration possible. Observe the respondent closely for satisfactory technique. If the blow was technically unsatisfactory, they will need to blow again (refer to section 10.6).
7. Take the spirometer from the respondent and record the appropriate readings in CAPI by using the down arrow to scroll through the display.
8. Switch off the spirometer to reset the unit. This is very important, otherwise the subsequent readings are based on the best of a series of tests and not on individual blows.
9. Repeat steps 3-8 until you have obtained five satisfactory blows. Most respondents should be able to manage what is required but there may be some that cannot. You must strike a balance between encouragement and over-insistence.
10. If the respondent wishes, record the results on their measurement record card, recording the highest obtained reading for each measure, even if they came from different blows.
6.6 Technically unsatisfactory blows
The following may result in a technically unsatisfactory blow, and if any of these occur the test should be repeated.
- Unsatisfactory start: excessive hesitation or "false start". It is probable that the spirometer will not record this blow (or give lung capacity as zero), but sometimes it will give a spurious reading.
- Laughing or coughing, especially during the first second of the blow. Some people will cough a little towards the end of expiration (particularly if this extends to 5 or 6 seconds) but this is acceptable.
- Holding the breath against a closed glottis (Valsalva manoeuvre). This results in spuriously high peak expiratory flow (see table 2).
- Leakage of air around the mouthpiece.
- Obstruction of the mouthpiece by tongue or teeth.
- Obstruction of the flowhead outlet by hands.
- If the spirometer takes more than 3 seconds to display the results after the end of the blow, it is likely that the results are spurious.
7 BLOOD PRESSURE
7.1 Introduction
Blood pressure is the exertion that the blood applies to the arterial walls as it is pumped through the circulatory system by the heart. Having a high blood pressure is an important risk factor for cardiovascular disease and stroke. The exact cause(s) of high blood pressure is not completely known however some factors known to affect blood pressure are smoking, family history, physical fitness and diet. It is important that we examine blood pressure using a standard method to see the distribution of blood pressure measurements across the population. This is vital for monitoring change over time.
7.2 Exclusion criteria
Respondents are excluded from the blood pressure measure if they are pregnant. If a pregnant woman wishes to have her blood pressure measured, you may do so, but do not record the readings in CAPI.
7.3 Consent
In addition to the verbal consent required to conduct all NatCen procedures (refer to section 2.1), written consent is required for the results to be sent to the respondent's GP. The appropriate form must be signed and dated by the respondent.
7.4 Equipment
You will need:
- An Omron HEM 907 blood pressure monitor
- Child/ small adult cuff (17-22 cm)
- Standard adult cuff (22-32 cm)
- Large adult cuff (32-42 cm)
- An AC adapter
Please note you will not get all of the cuff sizes in some of the studies, this is dependent on the sample involved in the individual surveys.
7.4.1 Using the Omron HEM 907
Figure 6 shows the monitor of the Omron
Figure 6 The Omron HEM 907 monitor
1. Switch the monitor on by pressing the ON/OFF button. Wait for the READY TO MEASURE symbol to light, indicating the monitor is ready to start the measurement (approximately 2 seconds).
2. Check that the MODE selector is set to AVG (average) and P-SET Volume (pressure setting) is set to auto.
3. Press the start button to begin the measurement. The cuff will start to inflate and take the first measurement. When the first measurement is complete, the LCD screen will show the systolic pressure, diastolic pressure and pulse rate. It will continue to do this at one minute intervals.
4. Press the ON/OFF button to turn it off.
5. If at any stage while you are taking the measurement you need to stop the monitor, press STOP and start the procedure again, as described in section 11.6.
7.4.2 Charging the battery
The Omron HEM 907 is equipped with a rechargeable battery, which is usable for approximately 300 measurements when fully charged.
When the battery symbol in the BATTERY display starts to flash there are 20-30 measurements left, you need to charge the battery soon. When a light battery symbol appears in the BATTERY display the battery needs to be put on charge immediately.
To recharge the battery:
Connect the monitor to the mains. A battery symbol will appear in the CHARGING display when the battery is charging. When ready to use the symbol will disappear. A dark battery symbol in the BATTERY display indicates that the battery is charged and the machine is usable. The battery can be charged in approximately 12 hours.
The Omron 907 is NOT designed to work off the mains adaptor, it should be run off the battery power pack. The mains adaptor should ONLY be used to charge the battery pack.
7.4.3 Technical faults/error readings
Refer to table 4 when error readings appear on the LCD screen.
Table 4 Troubleshooting for the Omron HEM 907
Error No. |
Action |
|---|---|
Er1, Er2 |
|
Er3 |
|
Er4 |
|
Er5, Er6 |
|
Er7, Er8 |
|
Er9 |
|
7.5 Preparing the respondent
During the initial interview, the respondent would have been informed not to eat, smoke, drink alcohol or participate in vigorous exercise 30 minutes before the nurse visit as this can cause blood pressure to be higher than normal. Before the procedure ask to see if they have carried out any of these activities and note their response in CAPI.
Select the right arm unless this is impossible. Ask the respondent to remove outer garment (e.g. jumper, cardigan, jacket) and expose their upper right arm by rolling up their sleeve. If the sleeve constricts the arm, restricting the circulation of blood, ask the respondent if they would mind taking their arm out of the sleeve for the measurement.
7.5.1 Selecting the correct cuff
Do not measure the upper arm circumference to determine which cuff size to use. Instead, choose the correct cuff size based on the acceptable range which is marked on the inside of the cuff. You will note that there is some overlap between the cuffs. If the respondent falls within this overlap range then use the standard cuff where possible.
7.6 Procedure
1. Check that the monitor is working.
2. Use the right arm, unless this is impossible. If the left arm is used, record this in CAPI.
3. Get the respondent to sit in a comfortable chair with a suitable support so that the right arm is resting at a level to bring the antecubital fossa (elbow) to approximately heart level. They should be seated in a comfortable position with legs uncrossed and feet flat on the floor.
4. Wrap the correct sized cuff round the upper right arm and check that the index line falls within the range lines. Do not put the cuff on too tightly as bruising may occur on inflation. Ideally it should be possible to insert two fingers between the cuff and the arm.
5. Locate the brachial pulse just medial to the biceps tendon and position the arrow on the cuff over the brachial artery. The lower edge should be about 1-2 cm above the cubital fossa (elbow crease).
6. Explain to the respondent that you need them to sit quietly for five minutes and that during that time they cannot eat, drink or smoke.
7. During this 'quiet time' follow the procedure for taking ambient air temperature (section 9) and just before taking the blood pressure reading, make a note of the air temperature.
8. After five minutes explain that you are starting the measurement, also explain that the cuff will inflate three times and each time they will feel some pressure on their arm. Ask them to relax, be seated in the position detailed in step 3 and not to speak until the measurement has been completed, as it may affect their reading.
9. Press start on the Omron HEM 907 to start the measurement. When the first measurement is complete it will be displayed on the LCD screen. Record this.
10. The unit will produce readings at one minute intervals thereafter, record the next two so you have three sets of readings in total. To check the readings press the 'Deflation' button. It is important that the three readings are recorded as the first reading is usually higher, and thus less accurate, than the other two readings as the respondent may be feeling nervous.
11. Press ON/OFF on the Omron to switch the unit off and remove the cuff from the respondent's arm.
12. If the respondent wishes, you should record details of their readings on the measurement record card.
7.7 Respondent feedback
When answering queries about a respondent's blood pressure it is very important to remember that it is NOT the purpose of the survey to provide respondents with medical advice, nor are you in a position to do so as you do not have the respondent's full medical history.
What you may say in each situation has been agreed with the Survey Doctor and CAPI will instruct you to read out the appropriate interpretations of the respondent's results. It is very important that the agreed script in the CAPI is read word for word and that personal interpretation is never offered.
The respondent feedback protocol should be strictly followed. It is very important that as little anxiety as possible is caused, but at the same time we have a duty to advise people to see their GP if the measurements indicate that blood pressure is raised.
7.7.1 Adult respondents
As stated previously we have a duty to inform people that they need to see their GP if their blood pressure is high. It is important that the instructions below are carefully read and guidelines always followed precisely.
The computer tells you which readings your advice should be based on. This will be based on the highest systolic and highest diastolic reading from the last two readings. This will usually, but not always, be from the same reading. For example, occasionally it may be the systolic from the second reading and the diastolic from the third reading. If the first reading is higher than the other two it should be explained that the first reading can be high because people are nervous of having their pressure taken.
Definitions of raised blood pressure differ slightly. The Survey Doctor has recommended the blood pressure ratings given below based on the most recent guidelines from the British Hypertension Society. It is important that you adhere to these definitions, so that all respondents are treated in an identical manner. These are shown in table 5.
Table 5 Definition of blood pressure ratings
ADULTS ONLY |
|||
|---|---|---|---|
SURVEY DEFINITION OF BLOOD PRESSURE RATINGS |
|||
For men and women aged 16+ |
|||
Rating |
Systolic |
Diastolic |
|
Normal |
<140 |
and |
<85 |
Mildly raised |
140 - 159 |
or |
85 - 99 |
Raised |
160 - 179 |
or |
100 - 114 |
Considerably raised |
180 or more |
or |
115 or more |
Points to make to a respondent about their blood pressure (given on screen):
Normal:
'Your blood pressure is normal.'
Mildly raised:
'Your blood pressure is a bit high today.'
'Blood pressure can vary from day to day and throughout the day so that one high reading does not necessarily mean that you suffer from high blood pressure.'
'You are advised to visit your GPwithin 2 months to have a further blood pressure reading to see whether this is a one-off finding or not.'
Raised:
'Your blood pressure is a bit high today.'
'Blood pressure can vary from day to day and throughout the day so that one high reading does not necessarily mean that you suffer from high blood pressure.'
'You are advised to visit your GPwithin 2 weeks to have a further blood pressure reading to see whether this is a one-off finding or not.'
Considerably raised:
'Your blood pressure is high today.'
'Blood pressure can vary from day to day and throughout the day so that one high reading does not necessarily mean that you suffer from high blood pressure.'
'You are strongly advised to visit your GPwithin 5 days to have a further blood pressure reading to see whether this is a one-off finding or not.'
(For all of the above points, you can also advise the respondent to see their practice nurse, if this is who they would typically see in relation to their blood pressure.)
Note: If the respondent is elderly and has considerably raised blood pressure, amend your advice so that they are advised to contact their GP within the next week or so about this reading. This is because in many cases the GP will be well aware of their high blood pressure and we do not want to worry the respondent unduly. It is however important that they do contact their GP about the reading within 7 to 10 days. In the meantime, contact the Survey Doctor who will inform the respondent's GP of their result, providing the respondent has given their permission (refer to table 6).
7.8 Action to be taken by the nurse after the visit
If you need to contact the Survey Doctor, unless there is a hypertensive crisis, do not do this from the respondent's home - you may cause unnecessary distress.
Table 6 summarises what action to take based on the readings you have obtained for a respondent. For this purpose you should only take into account the last two of the three readings you take, as the first reading is prone to error.
Table 6 Nurse action due to blood pressure readings
BLOOD PRESSURE |
ACTION |
|---|---|
Normal/mildly raised/raised BP Systolic less than 180 mmHg and Diastolic less than 115 mmHg |
No further action necessary If you feel that the circumstances demand further action, inform the Survey Doctor who will then inform the respondent's GP immediately if she deems it necessary.* |
Considerably raised BP Systolic at or greater than 180 mmHg or Diastolic at or greater than 115 mmHg |
Contact the Survey Doctor at the earliest opportunity and she will inform the respondent's GP if written consent has been given, or the respondent if not.* If the respondent has any symptoms of a hypertensive crisis** contact the survey doctor immediately or call an ambulance. The Survey Doctor must be informed as soon as possible. |
* You must still contact the Survey Doctor even if respondents tell you that their GP knows about their raised BP.
** A hypertensive crisis is an extremely rare complication of high blood pressure. Its signs and symptoms include diastolic bp > 135 mmHg, headache, confusion, sleepiness, stupor, visual loss, seizures, coma, cardiac failure, oliguria, nausea & vomiting.
The Survey Doctor will look at all high or unusual readings when they reach the office. If the reading is high, then the Survey Doctor will contact the respondent directly. The Survey Doctor will also routinely check fast and slow pulse rates so no further action is necessary regarding these.
Contact details for your Survey Doctor can be find in the project instructions. The Survey Doctor is generally available from 8.00-22.00. Calls outside these hours are either unnecessary or an emergency, in which case, the survey doctor is unlikely to be in a position to do anything practical and you should be using your professional judgement whether to call an ambulance or seek other urgent advice.
8 SALIVA
8.1 Introduction
Saliva samples are taken from respondents for analysis to detect various chemical compounds (depending on the aims of the individual surveys) to provide information on peoples health and lifestyle. These compounds include:
- Cortisol, indicating an individual's stress levels.
- Cotinine, a derivative of nicotine showing levels of exposure to tobacco smoke.
8.2 Exclusion criteria
Respondents are excluded from giving a saliva sample if they:
- Are pregnant
- Are HIV positive
- Have Hepatitis B or C
Do not ask for information regarding HIV and Hepatitis B or C, however if they volunteer it, record them as unable to give a sample and make a note.
8.3 Consent
There is a separate consent form for the saliva sample. This must be signed and dated by the respondent. Please make it clear to respondents that they will not receive results regarding their saliva sample (see section 2.5).
8.4 Preparing the respondent
Explain to the respondent what you will require them to do and the reasons behind why saliva samples are taken.
8.4.1 Equipment
You will need:
- Salivettes, consisting of dental roll and a tube.
- Gloves
8.4.2 Procedure
1. Remove the cap from the tube and instruct the respondent to take the dental roll from the tube, without touching it, by lifting the tube to their lips and letting the dental roll fall into their mouth. Further explain that they must leave it in their mouth until it is saturated with saliva.
2. Ask them to move it around in their mouth, without chewing it, as it helps to ensure thorough wetting of the dental roll. It will vary from person to person, however 3 minutes will be usually be ample.
3. If a respondent's mouth is excessively dry and they cannot produce saliva allow them to have a drink of plain water. Wait for 5 minutes before collecting the sample to ensure that water is not retained when the sample is given.
4. When the dental roll is sufficiently wet, ask the respondent to remove it from their mouth and put the dental roll back into the tube, avoiding touching it if they can.
5. Wearing gloves, check that the roll is saturated. The tube should feel noticeably heavier than an unused one. If the dental roll rattles around in the tube then it is not wet enough and you need to give it back to the respondent to put back in their mouth.
6. Once you are satisfied that it is saturated replace the cap on the tube and record in CAPI any problems you may have had. You should wear gloves at all times when you come in contact with a saliva sample.
8.5 Packaging the saliva sample
1. Make sure that the lid of the salivary tube is secure.
2. Label the tube (using the blue labels provided). Enter the respondent's serial number and date of birth on the label in blue biro (black ink will smudge).
3. Insert the tube in the packaging, either together with that respondent's blood container and urine sample (if obtained), or on its own. The choice of the appropriate size of packaging will depend on the total number of samples obtained by each respondent as explained below (three or fewer samples go in a small despatcher, more than 3 samples go in a large despatcher).
Continue to pack as instructed in relation to the blood samples.
9 SPOT URINE
9.1 Introduction
Urine, a waste product of human bodily functioning, can be analysed to provide information on various factors depending on the compound to be analysed (table 7). The information that is obtained is highly accurate and cannot be taken from any other source. Please note that the compounds that are analysed are dependent on the individual survey.
Table 7 Compounds in urine analysis
Chemical |
Definition |
|---|---|
Potassium |
Potassium is both an electrolyte and a mineral which works to keep a balance in bodily fluids and has an important role in nerve and muscle functioning. Potassium is found in fruit and vegetables and thus also indicates the fruit and vegetable intake of individuals. |
Sodium (salt) |
Sodium is both an electrolyte and a mineral which works to keep a balance in bodily fluids and has an important role in nerve and muscle functioning. Sodium is found in most foods and has been shown to contribute to high blood pressure which is a major risk factor in the development of cardiovascular disease. |
Urea and Nitrogen |
Urea and nitrogen are natural by-products of the human body. They are analysed to give an indication of kidney function. They also provide information on the amount of protein in an individual's diet. |
9.2 Exclusion criteria
Respondents are excluded from giving a urine sample if they:
- Are pregnant
- Are HIV positive
- Have Hepatitis B or C
Do not ask for information regarding HIV and Hepatitis B or C, however if they volunteer it, record them as unable to give a sample and make a note.
Women who have their period are not excluded from giving a urine sample. Respondents with a catheter are also not excluded. If the sample is taken from a catheter bag, this should be recorded in CAPI. It does not matter how long the urine has been in the collection bag.
9.3 Consent
There is a separate consent form for the urine sample. This must be signed and dated by the respondent. Please make it clear to respondents that they will not receive results regarding their urine sample.
9.4 Equipment
You will need:
- A 100ml Polypropylene disposable beaker
- A 10ml Sarstedt urine collection syringe and extension tube containing a small amount of a preservative
- An instruction leaflet on how to use and fill the Sarstedt syringe
- Coloured labels
- Gloves
- A polythene bag to store the equipment in and can be used to discard the used equipment once the sample has been taken (optional).
9.5 Preparing the respondent
Explain to the respondent that you need a urine sample and why it is important. Explain the equipment to them and show them how to use the Sarstedt syringe. A demonstration consisting of a syringe and a beaker filled with water can be used for this purpose. The instruction leaflet, similar to Section 16.5.1, can be left with the respondent for easy reference while performing the urine collection in private, if required. Explain the procedure below to the respondent. Tell them that you need them to follow the procedure as carefully as possible.
9.5.1 Urine sample syringe instructions
1. Collect your sample in the disposable pot.
2. Remove the small push cap.
3. Push the extension tube on the syringe nozzle.
4. Put the end of the tube into the urine in the beaker and pull back the syringe to fill it.
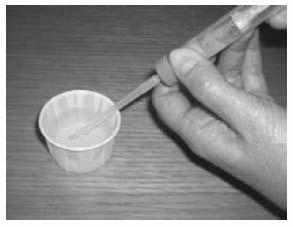
5. Remove the extension tube.
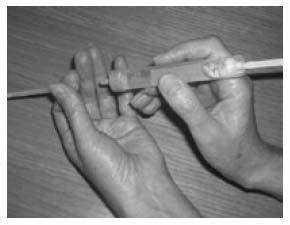
6. Replace the cap.
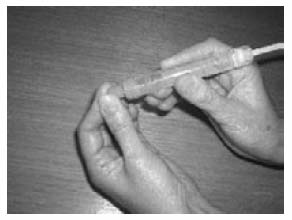
7. Pull the syringe plunger until it clicks and break off the stalk.
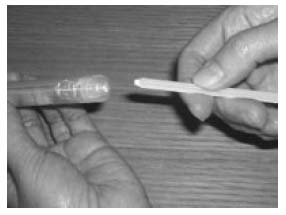
NB: Person in pictures should be wearing gloves!
9.6 Procedure
1. Respondents are to wash their hands with soap and water prior to voiding to avoid contaminating the sample with substances which may be on their hands. It is important that the inside of the urine collection beaker is not touched or allowed to come into contact with any part of the respondent's body, clothing or any external surfaces.
2. Ask the respondent to collect a mid flow sample of their urine in the disposable collection beaker.
3. Immediately after voiding they need to collect a sample of the urine by using the syringe as you have demonstrated to them and by following the instructions on the card. The collection of the urine sample needs to happen immediately after voiding to minimise specimen exposure to air.
4. Ask the respondent to wash the outside of the filled and sealed syringe and dry it using toilet roll, once the sample collection is complete.
5. If the respondent is unable to fill the syringe him/herself, or would rather not do so, you can do this for them. Emphasise that the sample needs to be taken from the sample straight away in order to minimise specimen exposure to air, so as soon as they have finished they need to bring it to you or leave it in the bathroom and notify you that the sample is ready. Please ensure that you are wearing gloves before attempting to fill the syringe for this respondent, you should wear gloves at all times when you come in contact with a urine sample.
6. Make sure that the plastic cap is securely sealed and the syringe plunger stalk snapped.
7. Label and package the sample according to the instructions below.
8. To dispose of the sample, pour the remaining urine in the toilet and throw the beaker and used equipment in the rubbish bin (if the respondent prefers, this can be put in a polythene bag first and then thrown in the rubbish bin).
9.7 Packaging the urine sample
Make sure that the plastic cap is securely sealed, and the syringe plunger stalk snapped.
Label the urine sample tube (using the blue labels). Enter the respondent's serial number and date of birth on the label (in blue biro). Put the label on the tube after the sample has been collected (otherwise the label might get wet in the process!).
Insert the tube in the despatch container, either together with that respondent's blood container and/or saliva sample (if obtained), or on its own. The choice of the appropriate size of packaging will depend on the total number of samples obtained by each respondent as explained below (three or fewer samples go in a small despatcher, more than 3 samples go in a large despatcher).
Continue to pack as instructed in relation to the blood samples.
10 BLOOD SAMPLING (NON FASTING)
The protocol for taking blood samples set out below is written in accordance with the Clinical Procedure Guidelines: Venepuncture. All nurses are to read this document before carrying out any venepuncture procedure.
10.1 Introduction
Blood samples are taken from respondents as they provide information on various analytes, giving a detailed description of the health of an individual. They are integral to the research NatCen undertakes as they give a comprehensive representation of the health of the population that cannot be obtained from any other source.
Each study is interested in different analytes and the ones analysed for SHeS 2008 are listed below along with information on what they measure.
Table 8 Blood analytes
ANALYTE |
WHAT IT MEASURES |
|---|---|
C-reactive protein |
The level of C-reactive protein in the blood gives information on inflammatory activity in the body, and it is also associated with risk of heart disease. |
Fibrinogen |
Fibrinogen is a major determinant of platelet aggregation and blood viscosity. It is a major independent risk factor for cardiovascular disease ( CVD) and may interact with lipids to promote CVD risk. |
Glycated Haemoglobin |
Glycated haemoglobin is a measure of the respondent's longer term glycaemic status. High levels are indicative of poor control of, or undiagnosed diabetes. |
Total and HDL cholesterol |
Total cholesterol increase the risk of atherosclerosis ('furring' of the arteries). Raised levels are associated with higher risks of heart attacks, while HDL cholesterol has a protective role. |
The blood will not be tested for any viruses, such as HIV ( AIDS).
10.2 Exclusion criteria
All respondents with the following exceptions are eligible to give blood:
- Pregnant women
- People with clotting or bleeding disorder
By clotting or bleeding disorders we mean conditions such as haemophilia and low platelets, i.e. thrombocytopenia. There are many different types of bleeding/clotting disorders but they are all quite rare. The reason these respondents are excluded from blood sampling is that:
a) the integrity of their veins is extremely precious
b) we do not wish to cause prolonged blood loss
For the purposes of blood sampling, those who have had, for example, a past history of thrombophlebitis, a deep venous thrombosis, a stroke caused by a clot, a myocardial infarction or an embolus are NOT considered to have clotting disorders.
- People who have ever had a fit
Respondents who have ever had a fit (e.g. epileptic fit, convulsion) should not be asked to provide a blood sample. This applies even if the fit(s) occurred some years ago.
- People who are currently on anticoagulant drugs, e.g. Warfarin therapy
Check if the respondent has a clotting or bleeding disorder or is on anticoagulant drugs, such as Warfarin, and record this in CAPI. These are very uncommon. If you find someone with these problems, do not attempt to take blood, even if the disorder is controlled.
Aspirin therapy is not a contraindication to blood sampling. If you are uncertain whether a condition constitutes a contraindication to blood sampling, the Survey Doctor will be happy to answer your queries.
- Adults who are not willing or able to give their consent in writing
10.3 Consent
As blood taking is an invasive procedure we need to obtain written consent as well as verbal consent to take it. This has to be obtained from the respondent in all cases. If you cannot obtain written consent, the computer will direct you to circle the relevant codes.
On no account should you ever take blood before you have obtained written consent to do so from the respondent.
There are three further written consents we wish to obtain in respect to blood sampling
a. Consent to send the results to the GP
b. Consent to store a small amount of the blood
c. Consent to send the results to the respondent
You should seek to obtain all these consents before you take any blood.
Small quantities of blood are being stored in special freezers for further analysis in the future. Future analysis will definitely not involve tests for viruses (e.g. HIV ( AIDS) test). Any future analysis will be unlinked which means that the researcher doing the analysis will not be able to link it back to the respondent. Respondents will therefore not receive the results of any tests done on their blood in the future.
The questions on the CAPI questionnaire will take you step by step through all the procedures for obtaining consents. Make sure you follow these carefully - recording consent codes as instructed and giving reasons for refusals, if applicable.
In summary:
- Ask the respondent if they would be willing to have a blood sample taken. Try to reassure respondents about the process, and be prepared to answer their concerns. You will need to explain the importance of written consent to the respondent
- Obtain written consents on the appropriate consent form. Remember to enter their name at the head of this form before asking the respondent to sign.
- Remember to enter your name in the qualified nurse space provided on each form.
- Check that you have circled the correct consent codes on the front of the consent booklet.
10.4 Equipment
The equipment required is listed on page 8 of the Clinical Practice Guideline for Venepuncture ( CPG).
10.5 Preparing the respondent
Protocol on preparing the respondent can be found in the CPG on page 8.
Further points to note include:
- Ask the respondent to remove any jackets, thick garments and/or roll their sleeves up.
- Instruct the respondent to remain as still as possible
- Do not ask the respondent to clench his/her fist.
10.6 Procedure
The procedure for taking the blood sample can be found in the CPG pages 9-12. This procedure is to be followed. It is to be used in conjunction with CAPI which will guide you through the blood sampling process.
Additional points to note include:
- The vacutainers should be filled to capacity in turn and inverted gently on removal to ensure complete mixing of blood and preservatives.
IMPORTANT WARNING
Never re-sheath the needle after each use
Do not allow the disposal box to become overfull as this can present a potential hazard
10.6.1 Labelling the Blood Tubes
Label the tubes as you take the blood. It is vital that you do not confuse blood tubes within a household.
Use the set of serial number and date of birth labels (blue) to label the vacutainer tubes. Attach a serial number label to every tube that you send to the lab. Enter the serial number and date of birth very clearly on each label. Make sure you use blue biro - it will not run if it gets damp. Check the Date of Birth with the respondent again verbally.
Stick blue label over the label already on the tube. The laboratory needs to be able to see on receipt how much blood there is in the tube.
We cannot stress too much the importance of ensuring that you label each tube with the correct serial number for the person from whom the blood was obtained. Apart from the risk of matching up the blood analyses to the wrong person's data, we will be sending the GP the wrong results. Imagine if we detect an abnormality and you have attached the wrong label to the tube!
10.6.2 Packaging the Blood Tubes
Pack the tubes for each respondent separately from those of other members of the household. All tubes from one person should be packed together in one despatch container. You have been provided with two different types of despatch containers, a small one and a large one. Depending on the total number of samples each respondent provides, you will need to use the appropriate packaging:
As a rough guide, adults who provide a blood, saliva and urine sample will need a large despatch container, while others will just require the small size. The capacity of the small despatch containers is 4 sample tubes provided that there is no urine sample (3 blood plus one saliva). For 3 blood tubes plus a urine tube, you will need the large despatchers. For more than 4 sample tubes, you will also need to use the large despatchers.
10.6.3 Posting the blood samples
The size of the packaging means you will not be able to post blood samples in a letter box. The samples will have to be taken to the post office for posting.
The samples should be posted within 24 hours of the sample been taken. Try to avoid taking samples if you think that you will be unable to post it within 24 hours.
10.6.4 Weekend posting
If you miss the Saturday post collection, the sample must be posted on the following Monday morning.
10.6.5 Storage of blood samples
If you are unable to post the samples immediately, they can be stored at room temperature.
When you have posted the samples, fill in the time and date of posting on the office copy of the Despatch Notes.
10.6.6 Completing the Blood Despatch Notes
The Consent Booklet contains two Despatch Notes, one for the Lab one for the Office. The Lab copy should be filled in and sent to the laboratory with the blood, saliva and urine samples.
- Enter the respondent's serial number very carefully. This should both correspond to your entry on page 1 of the Consent Booklet and to the serial numbers you have recorded on the tubes.
- Complete items 2, 3 and 4. Check that the date of birth is correct and consistent with entry on nurse schedule and tube label.
- Complete item 5.
- At Item 6 ring a code to tell the laboratory whether or not permission has been obtained to store part of the blood. Your entry here should correspond to your entry at Item 8e on the front page of the booklet.
- At Item 7 enter your Nurse Number.
Tear off the Lab despatch note and send with the samples to the laboratory.
You also need to complete the Office DESPATCH in the consent booklet. This tells us the date you sent the samples to the lab and indicates what we should expect back from the laboratory.
If you have only achieved an incomplete blood sample (e.g. have only filled one tube), please state this clearly on both copies of the despatch note and give the reason.
10.7 Other important points
10.7.1 Venupuncture check questions
Always complete the Venepuncture checklist on CAPI for every respondent from whom you attempt to take blood. This shows that you have followed the correct procedure, and noted, where applicable, any abnormalities, and the action you took. The checklist follows directly after you have taken blood samples.
Please remember to check the respondent just before you leave and note any changes in their physical appearance in CAPI.
10.7.2 Fainting respondents
If a respondent looks or feels faint during the venepuncture procedure, it should be discontinued. The respondent should be asked to lie down with feet elevated.
If they agree for the test to be continued after a suitable length of time, the procedure should be performed with the respondent lying down and the circumstances should be recorded in CAPI. It is acceptable for the respondent to discontinue the procedure but agree to give the blood sample at a later time.
Remain with the respondent until they feel able to slowly move to a sitting position and until they are happy for you to leave them. Ensure you submit a Special Report Form to the Operations Standards Co-ordinator detailing what happened and how the respondent appeared when leaving.
10.7.3 Handling & disposal of needles and other materials
Safe disposal of needles is required to control the risk of injury from the disposed sharps. Without the safe disposal of needles there is an increased risk of needle stick injuries and/or psychological trauma due to fear of potential infection.
Precautions
- Wear gloves at all times when performing the venepuncture procedure
- Do not carry sharps unnecessarily
- Handling must be kept to a minimum
- Needles must not be passed directly from hand to hand
- Needles must not be bent or broken prior to use
- Needles should not be resheathed by hand
- Never lay sharps down on beds or work surfaces, or leave lying amongst paper towels or linen
- Sharps should be disposed of at the point of use
- Never hand sharps to anyone
Disposal
Do's:
- Always wear gloves when performing venepuncture procedure
- Bins should conform to British Standard 7320
- Sharps must always be disposed of in the approved yellow 'sharps bins'
- Sharp bin should be available beside you before opening and using the sharp
- Ensure that the lid is secure
- Dispose of the sharp bin when the manufacturer's marked line has been reached or when it is three quarters full
- Carry sharp containers by the handle
- Dispose of the sharp in the bin immediately after use
- Check to ensure that the bin lid is securely attached to the base and that the flap has been securely closed and sealed
Don'ts:
- Overfill sharps bins
- Fill sharps containers above the manufacturer's marked line
- Dispose of sharps with other clinical waste
- Place used sharps containers in yellow bags for disposal
- Put your hands into sharps bins
- Never return any used sharps bins by post or courier to the Operations Department or other member of the freelance nurse or interviewer panel
Place the used needles and the vacutainer holders in the sharps box and put gloves etc in the self-seal disposal bag. The needle disposable box should be taken to your local hospital or GP practice for incineration. Telephone them beforehand, if you are not sure where to go. If you cannot find a place to dispose of the sharps bin, contact your nurse supervisor who will be able to give you information on appropriate places.
The sealed bag containing gloves etc can be disposed of with household waste as long as it does not have any items in it that are contaminated by blood.
10.7.4 Needle stick injuries
The following information is based on guidelines from the Department of Health, immediately following exposure.
First Aid
- Encourage wound to bleed.
- Do not suck.
- Wash liberally with soap and water without scrubbing, do not use antiseptics and skin washes.
- Dry and apply waterproof dressing.
- Exposed mucous membrane and conjunctivae should be irrigated copiously with water.
Following the above procedure it is recommended that the nurse attend a nearby accident and emergency department to ensure immediate current needle stick injury assessment/ treatment.
Please note that you should not take any further action in the respondent's home; any further procedures which might be necessary (such as taking a sample of the respondent's blood) would be carried out by somebody else.
Report
- Incident to be reported as soon as possible to Nurse Supervisor, who will report the incident to the Survey Doctor.
- Special Report form to be completed and sent to Operations Standards Co-ordinator at Brentwood.
As soon as the nurse supervisor hears, she will ensure that the nurse is offered appropriate advice and support.
10.7.5 Respondents who are HIV or Hepatitis B positive
If a respondent volunteers that they are HIV, Hepatitis B or Hepatitis C positive, do not take a blood sample. Record this as the reason in the CAPI. You should never, of course, seek this information.
10.8 Respondent feedback
Results from some blood tests (though not necessarily all) can be sent to the respondent. If the respondent gives written consent for the results of their blood sample to be sent to their GP then they are able to get feedback on the results.